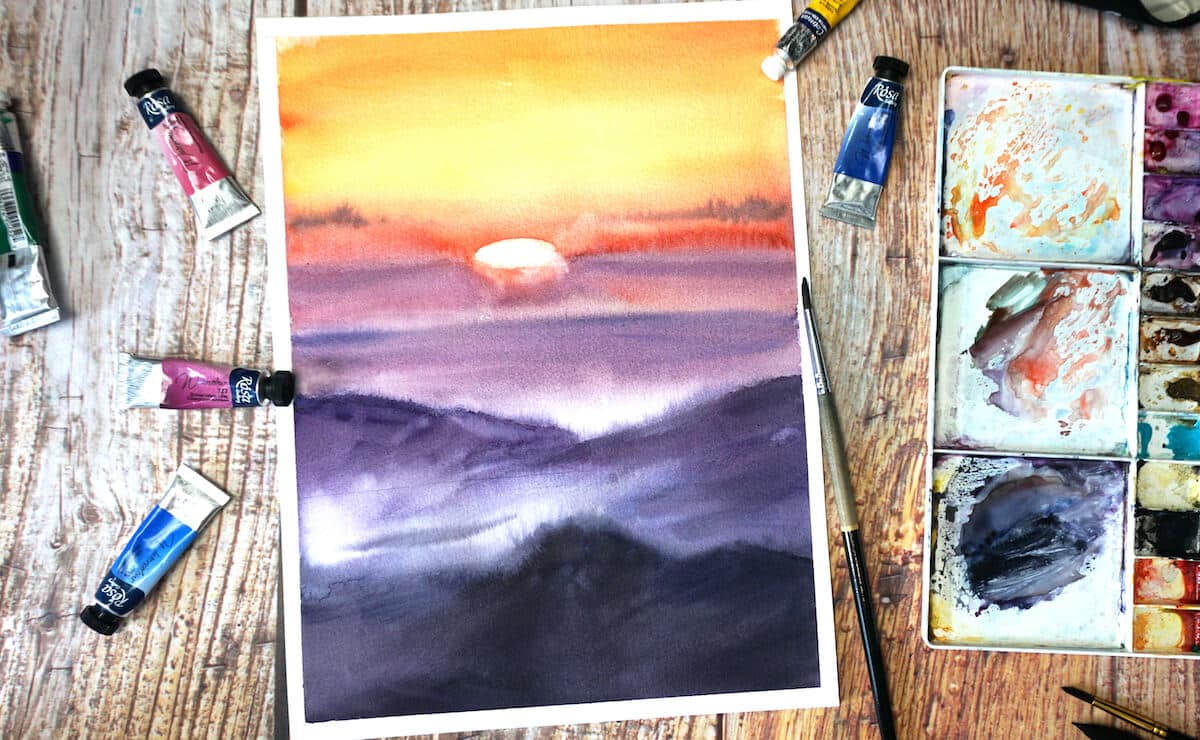
Ready to paint a sunset in watercolor? Great! First things first, let’s prepare our art materials:
Watercolors: I used a professional grade watercolor Rosa, and some selected colors from other professional brand. However, you absolutely can use a student grade watercolor. What important here is paper!
Paper: 100% cotton paper of any brand. I used Canson. You can take any brand of your liking. We need specifically cotton paper to be able to work with wet on wet technique and move layers smoothly. The texture of my paper was cold pressed. It is the most comfortable texture for landscape paintings.
Brushes: big flat synthetic brush (to apply clean water on the sheet), mid-sized round natural brush (to work on main layers of the sunset), small-sized round synthetic brush (for paint lifting and details).
And additional tools such as pencil for a light sketch, eraser (if needed), tape to attach your paper sheet to a board or table, cup of water and paper tissues.
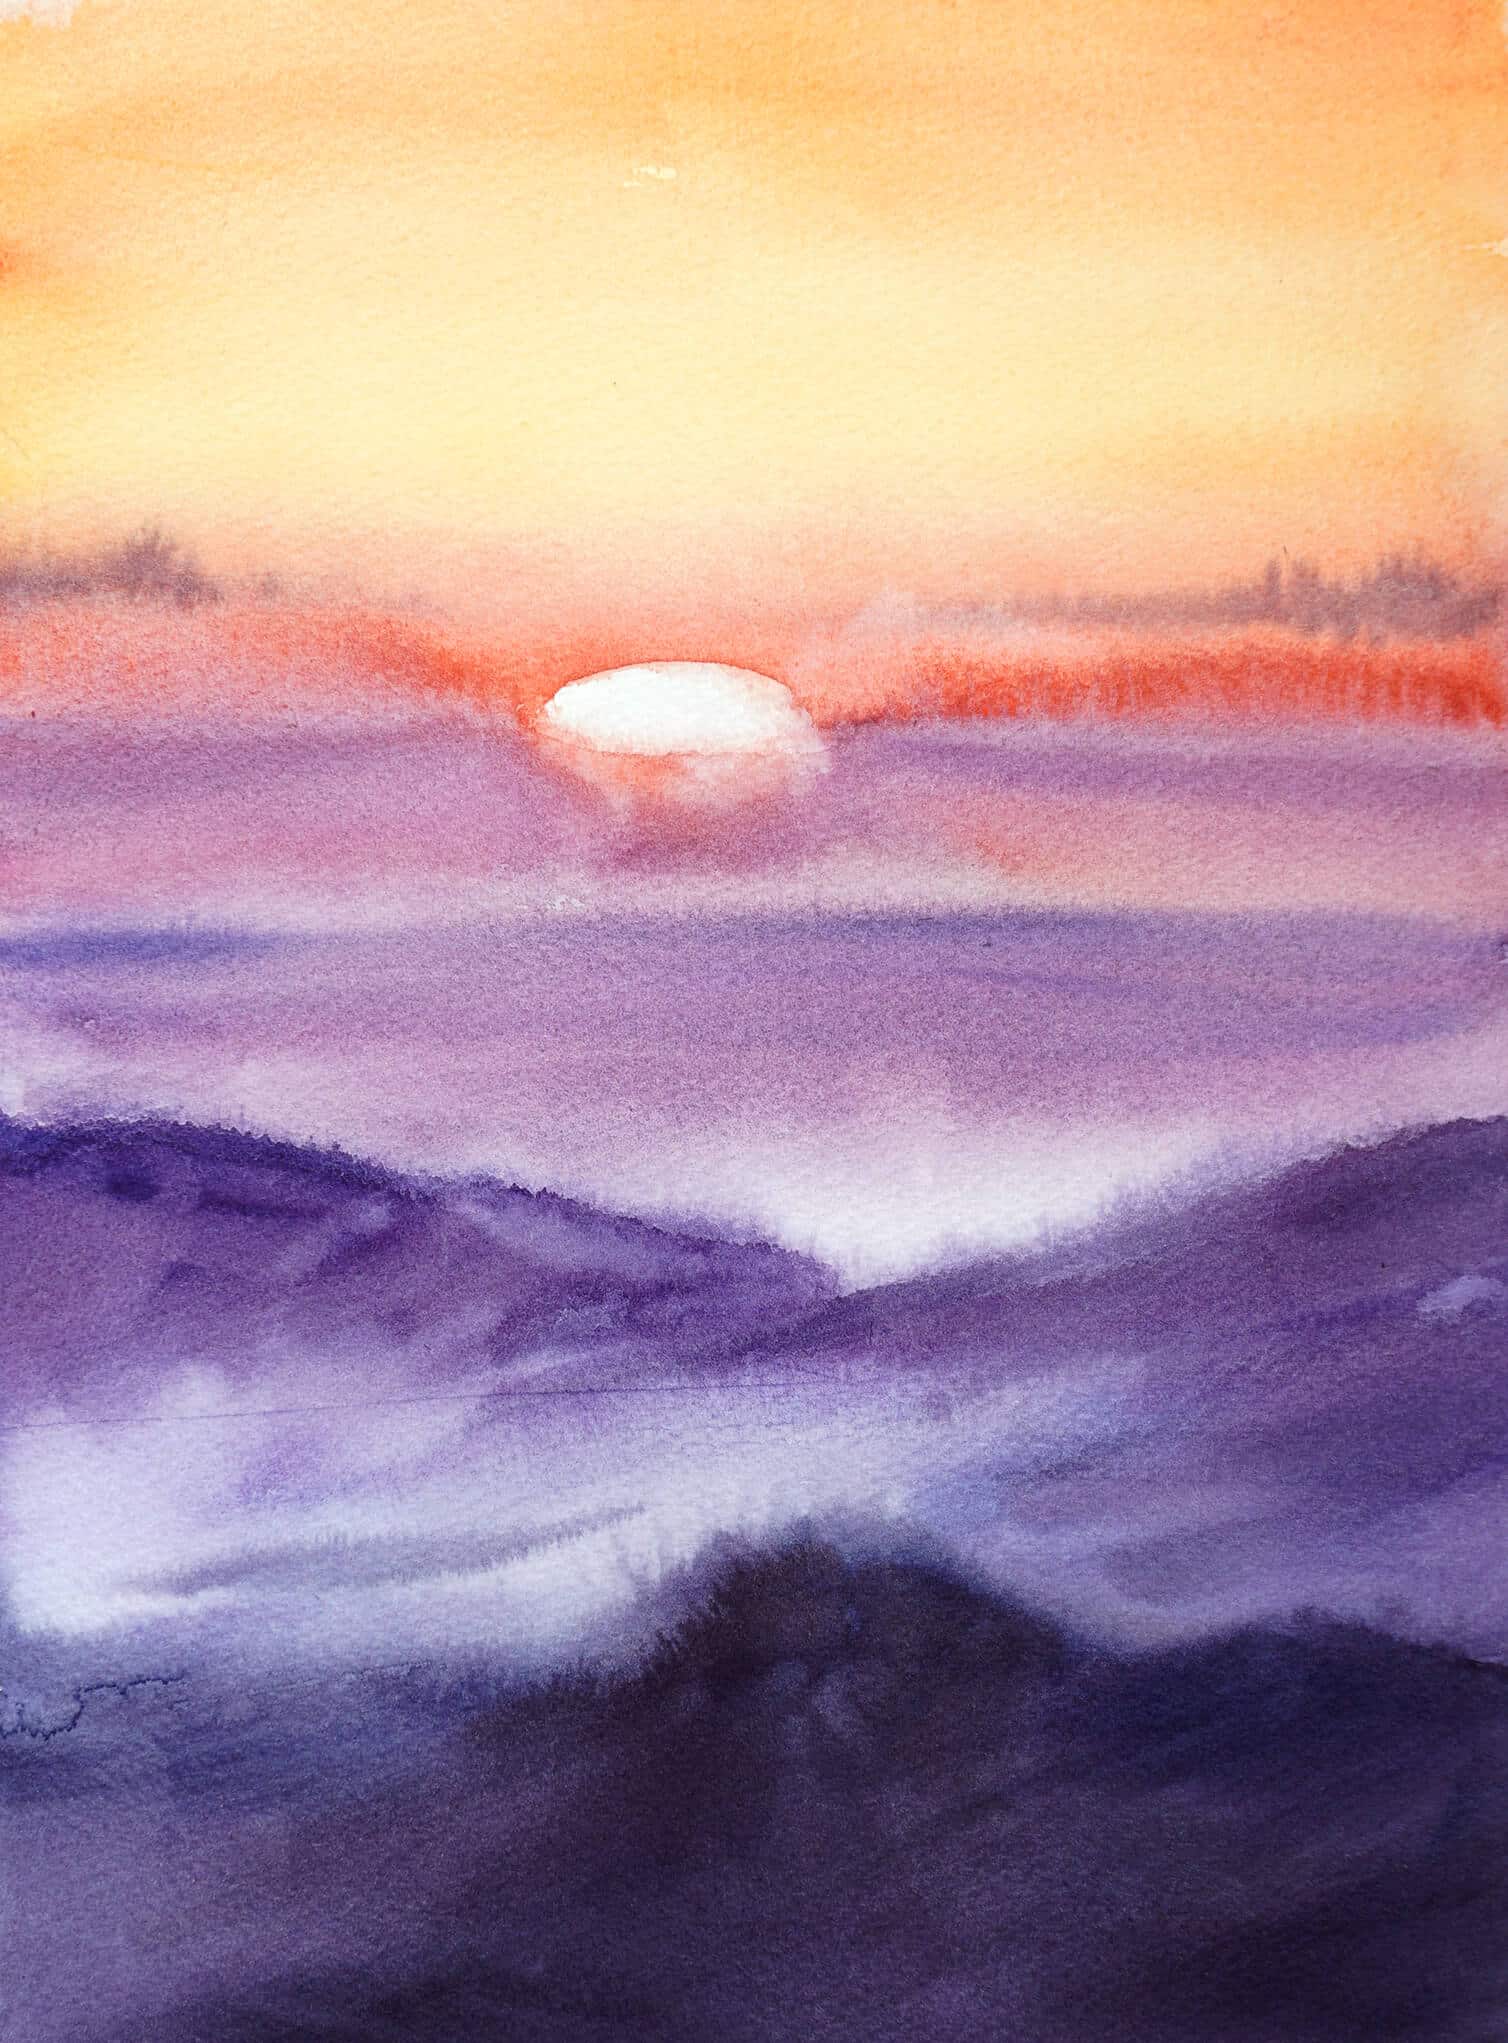
➠ Download the reference image
I don’t offer a sketch in this tutorial since the picture is very simple, you don’t even need to outline those lines. It will happen naturally as you apply watercolor stroke by stroke. Just mark the area where you will have the sun (in the center of the sheet but above the middle line). You can mask it with a masking fluid if you are worried about covering it with paint in a process.
When you are all set, time to get started! I got a cup of coffee to go along with this painting, and the first step is…
LIFETIME ACCESS OFFER

Lifetime access to 47 watercolor classes taught by a professional artist.
✅ Full library access, 47 classes
✅ Beginner to Advanced crash course
✅ All our ads-free YouTube videos
✅ Private Facebook group
✅ Real Teacher Feedback
✅ Optional Coaching Sessions

Let’s start to paint a sunset
What are sunsets like in your part of the world? It is no doubt a huge source of inspiration for a painter or photographer. Today we will work on a relatively quick painting, and the secret to it is 2 things: 100% cotton paper and wet on wet technique!
Total time: 1 hour
Step 01
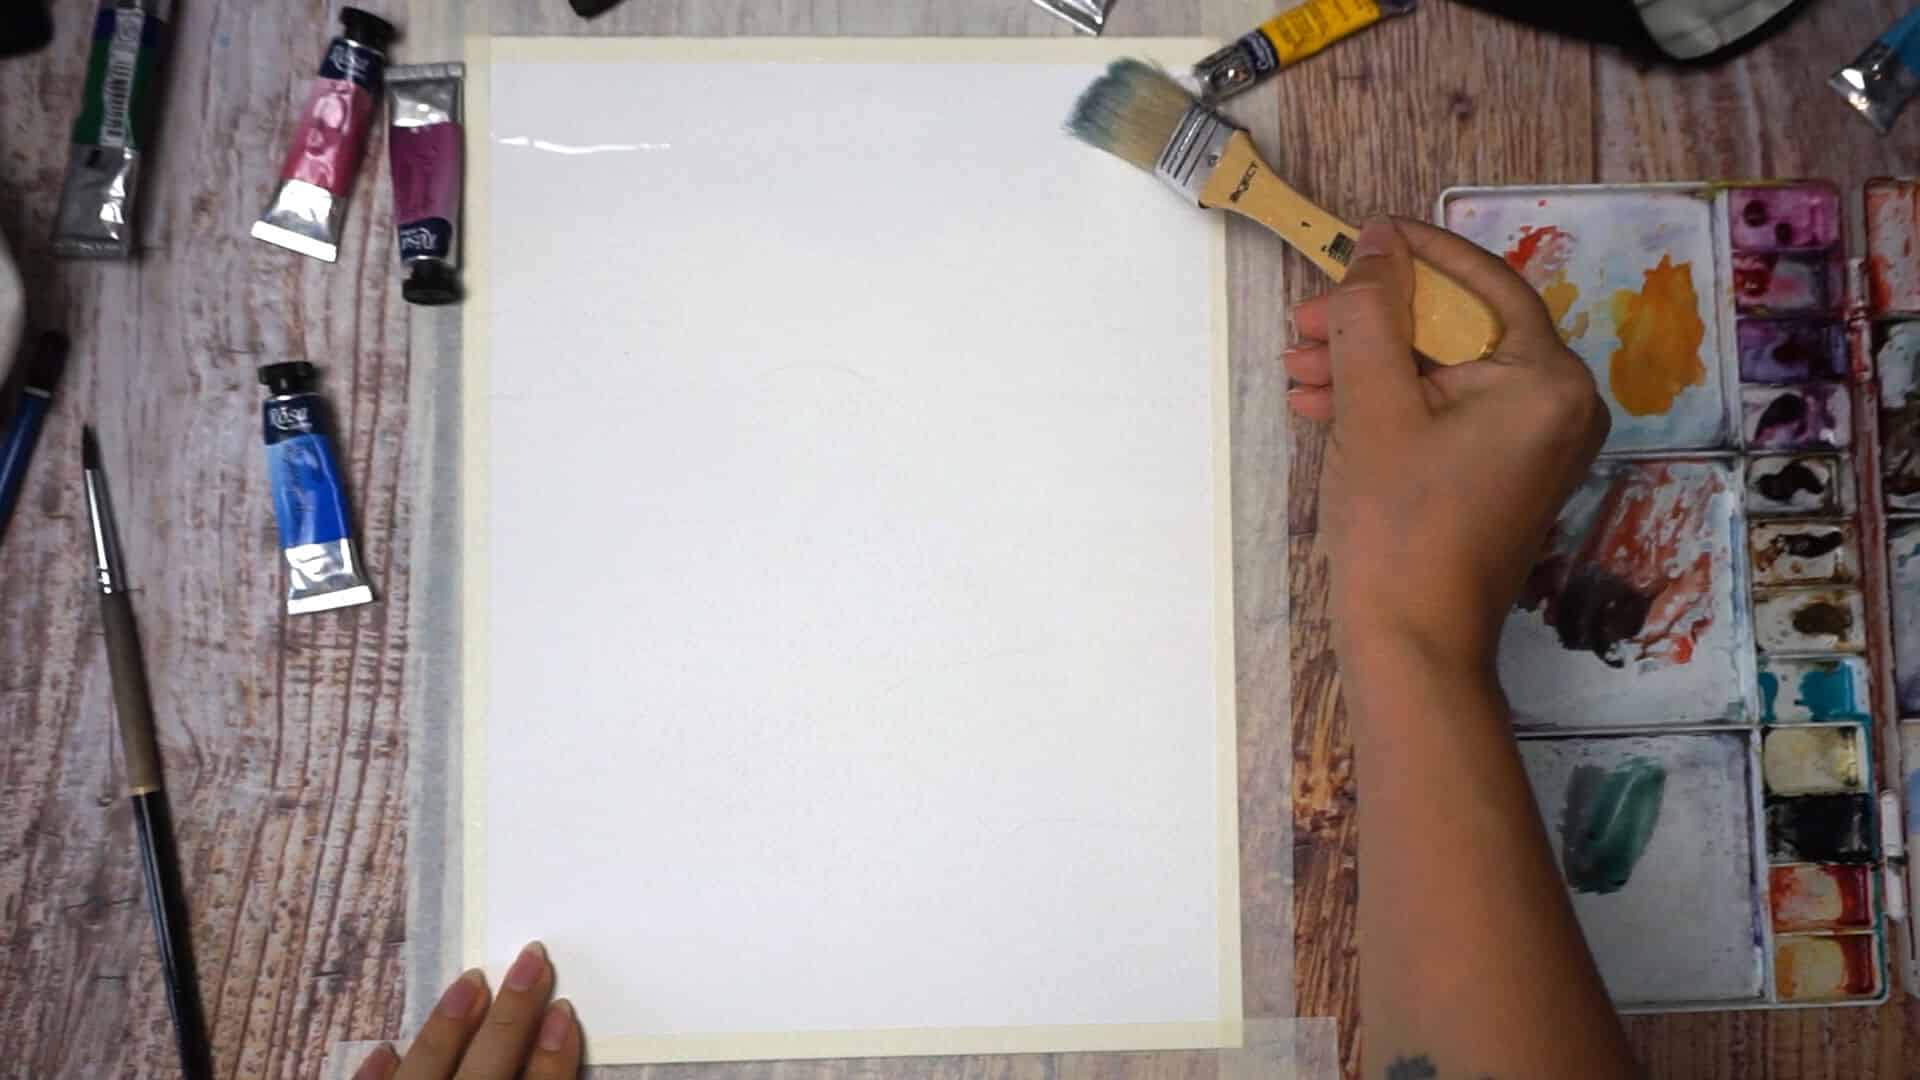
Apply clean water on the whole paper sheet, from top to bottom. We will work in wet on wet technique which requires a lot of water. Big flat brush works best for such tasks covering big areas in a short time.
Don’t forget to attach your paper with a tape to avoid warping. The sheet will most definitely deform even with the tape, but it will get beck to perfectly straight when it dries out!
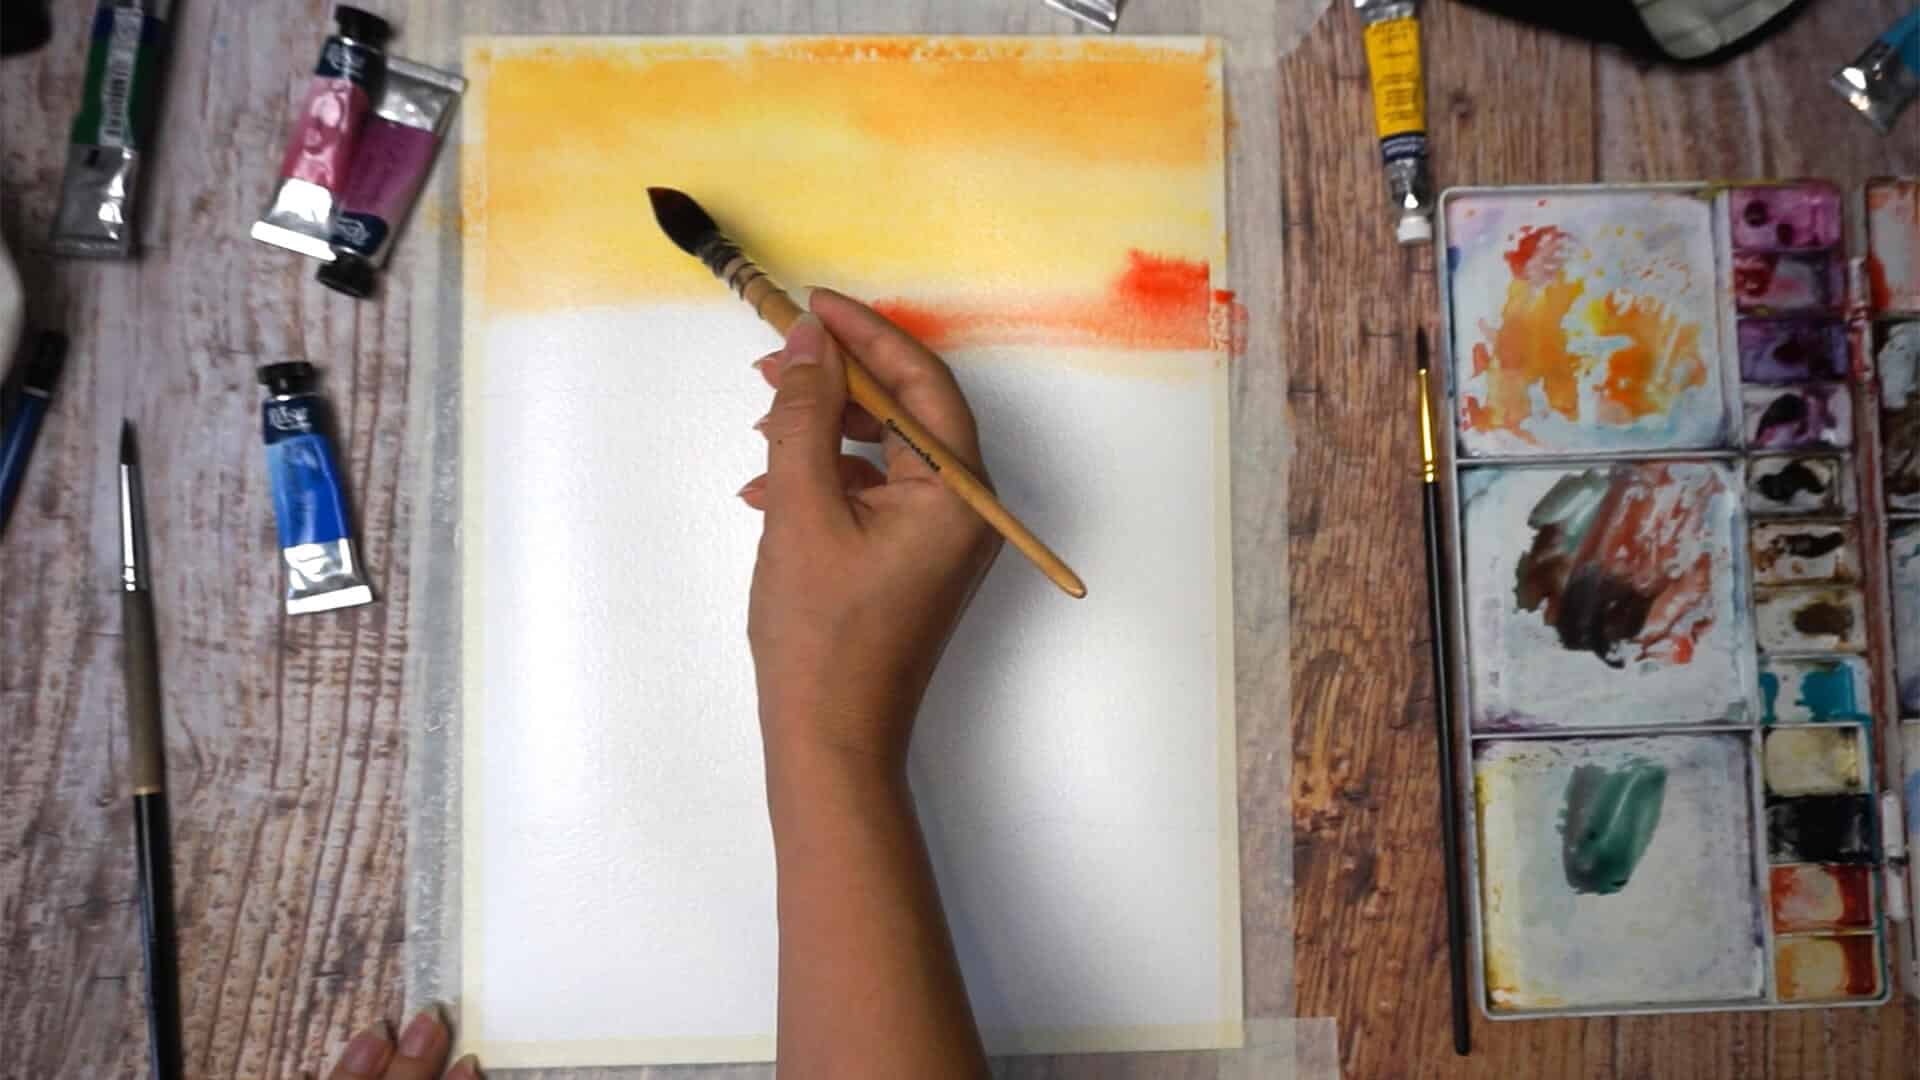
Step 02
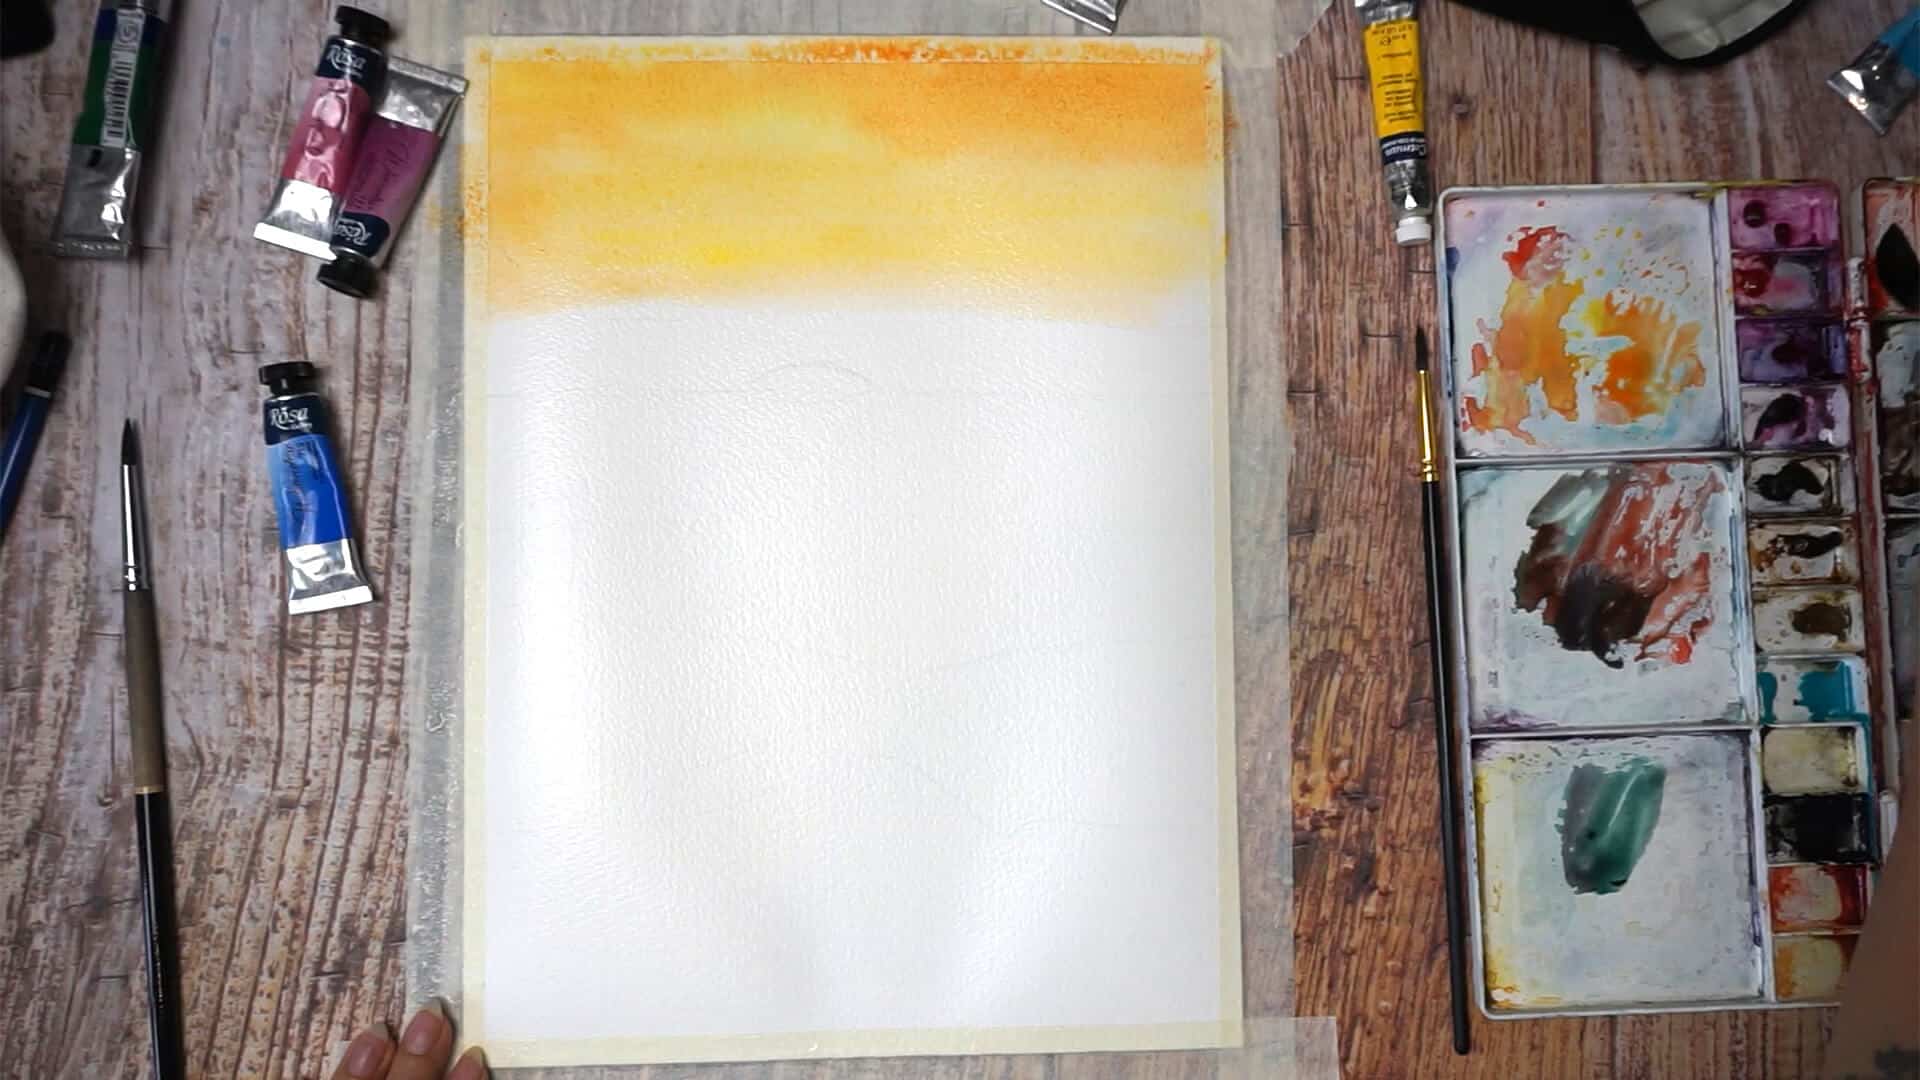
While your cotton paper absorbs this water, you get a couple of minutes to mix the colors you need for the sky. I took Cadmium Yellow and added a tiny drop of Cadmium Red on my palette. I didn’t want my yellow colors of the sunset to be striking bright, so I calmed it a little with red.
So first I applied pure yellow as a background color and right away added another stoke of my mixed orange color (Cadmium Yellow + Cadmium Red). Because paper was wet the paint spread and mixed smoothly. Using a round natural brush also simplified the task since it absorbs a lot of liquid and releases a lot of liquid. It is very convenient to quickly create wide and soft washes as you can see on a photo.
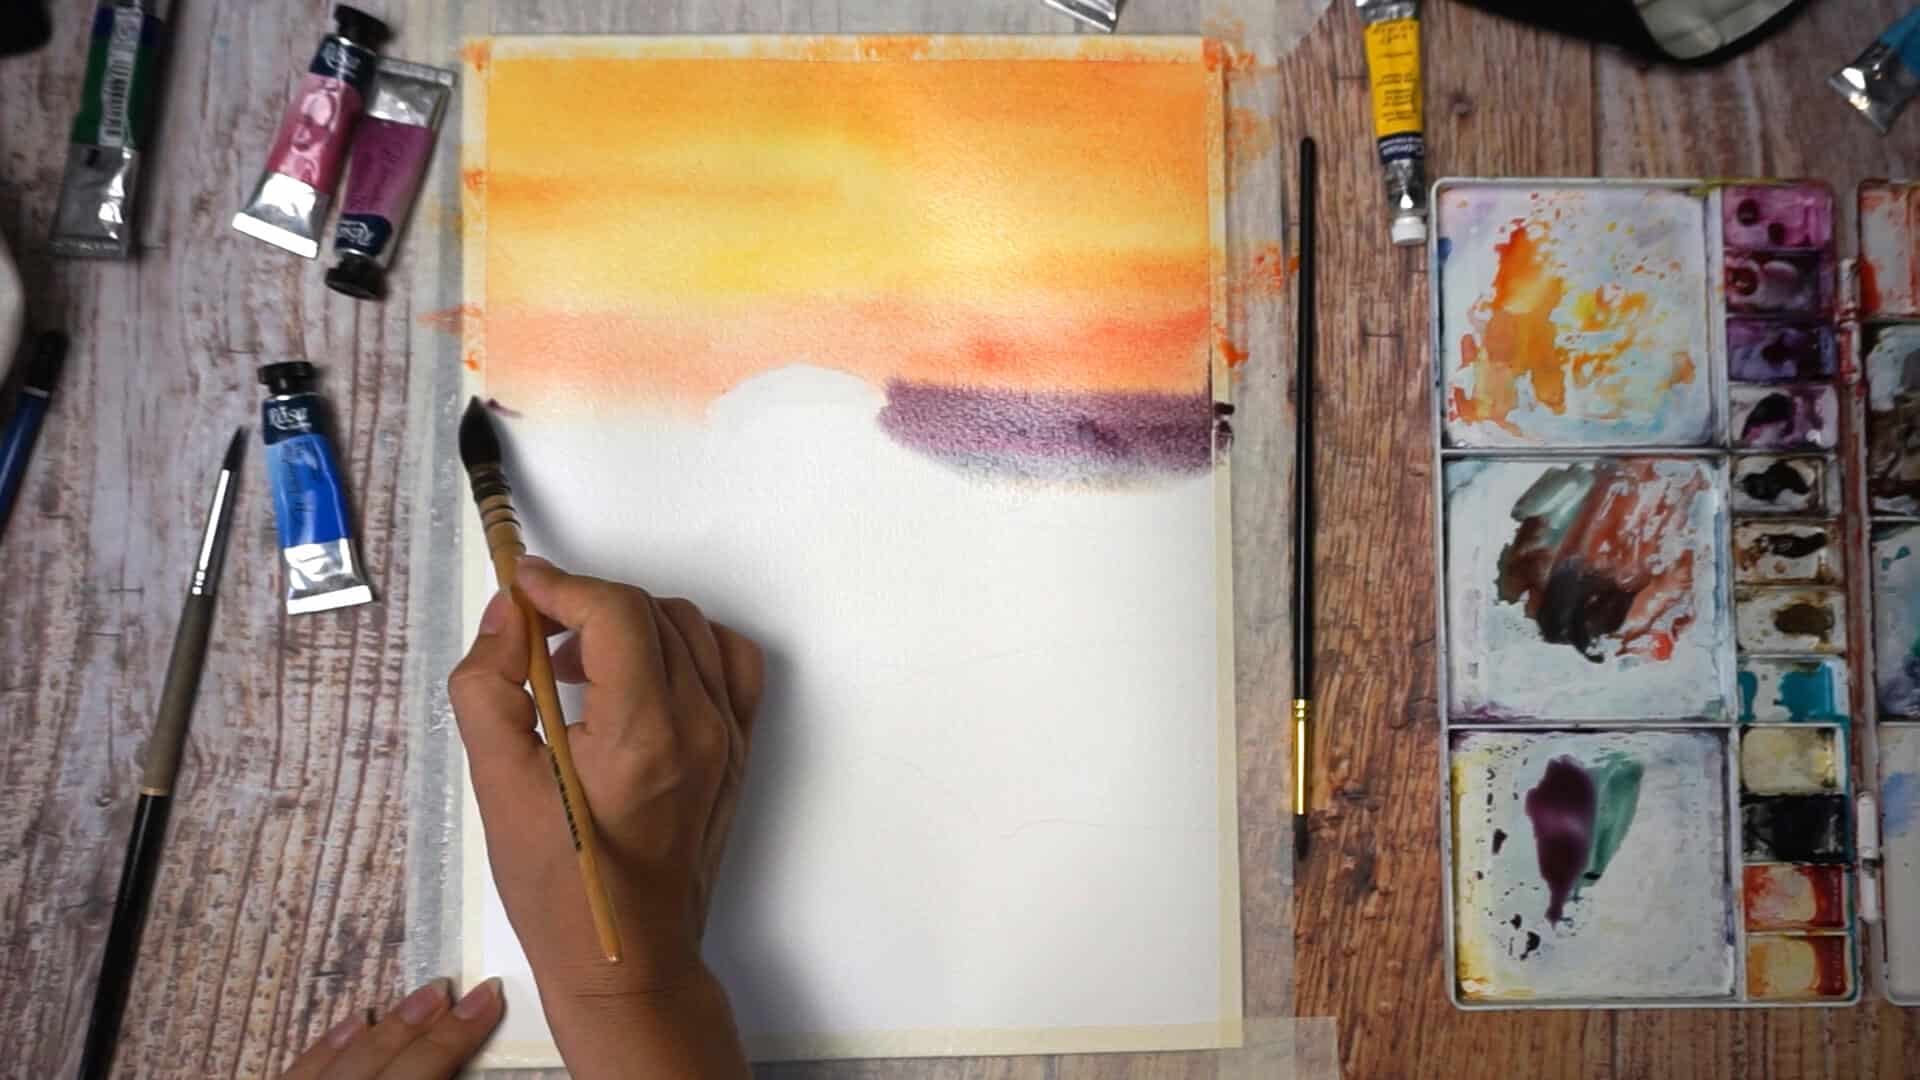
Step 03
Now add more red color into your orange mix so that red color is dominating. Right away add another stroke to extend your first layer. Essentially, we are using a mixed wash here – creating a nice and smooth layer (without sharp connecting edges or any visible lines) which consists of different colors.
If you are not familiar with types of washes and how to paint them, check out a Beginner course where we have dedicated lessons.
Do the same of the left from the sun. You can as well blend your red stoke up (toward yellow part of the sky) to incorporate it more organically.
Important detail here: I decided to not mask the sun with a masking fluid, so I need to be very careful to not get any paint into the area of the sun. I need to keep the whiteness of the paper and paint around the sun (negative painting technique).
Step 04
The magic of cotton paper is that it keeps liquid deep in its layers and stays wet for quite a long time (comparing to cellulose paper). This means any paint I inject into existing (still wet) layer will blend in organically. If I did the same on cellulose paper, it would either wash out my previous layer or leave a sharp outline. None of those are good for this type of painting.
So now I am moving to a darker part of the sunset. I mixed Quinacridone Lilac with a drop of Cadmium Red and Indanthrene Blue. I prefer Indanthrene over Ultramarine because the later give granulation effect. Eventho I love it I think it is not very appropriate for this sunset painting.
Apply this mix right under your previous stroke both on right and left sides of the sun. Here as well remember to paint around the sun to keep it clean and white.
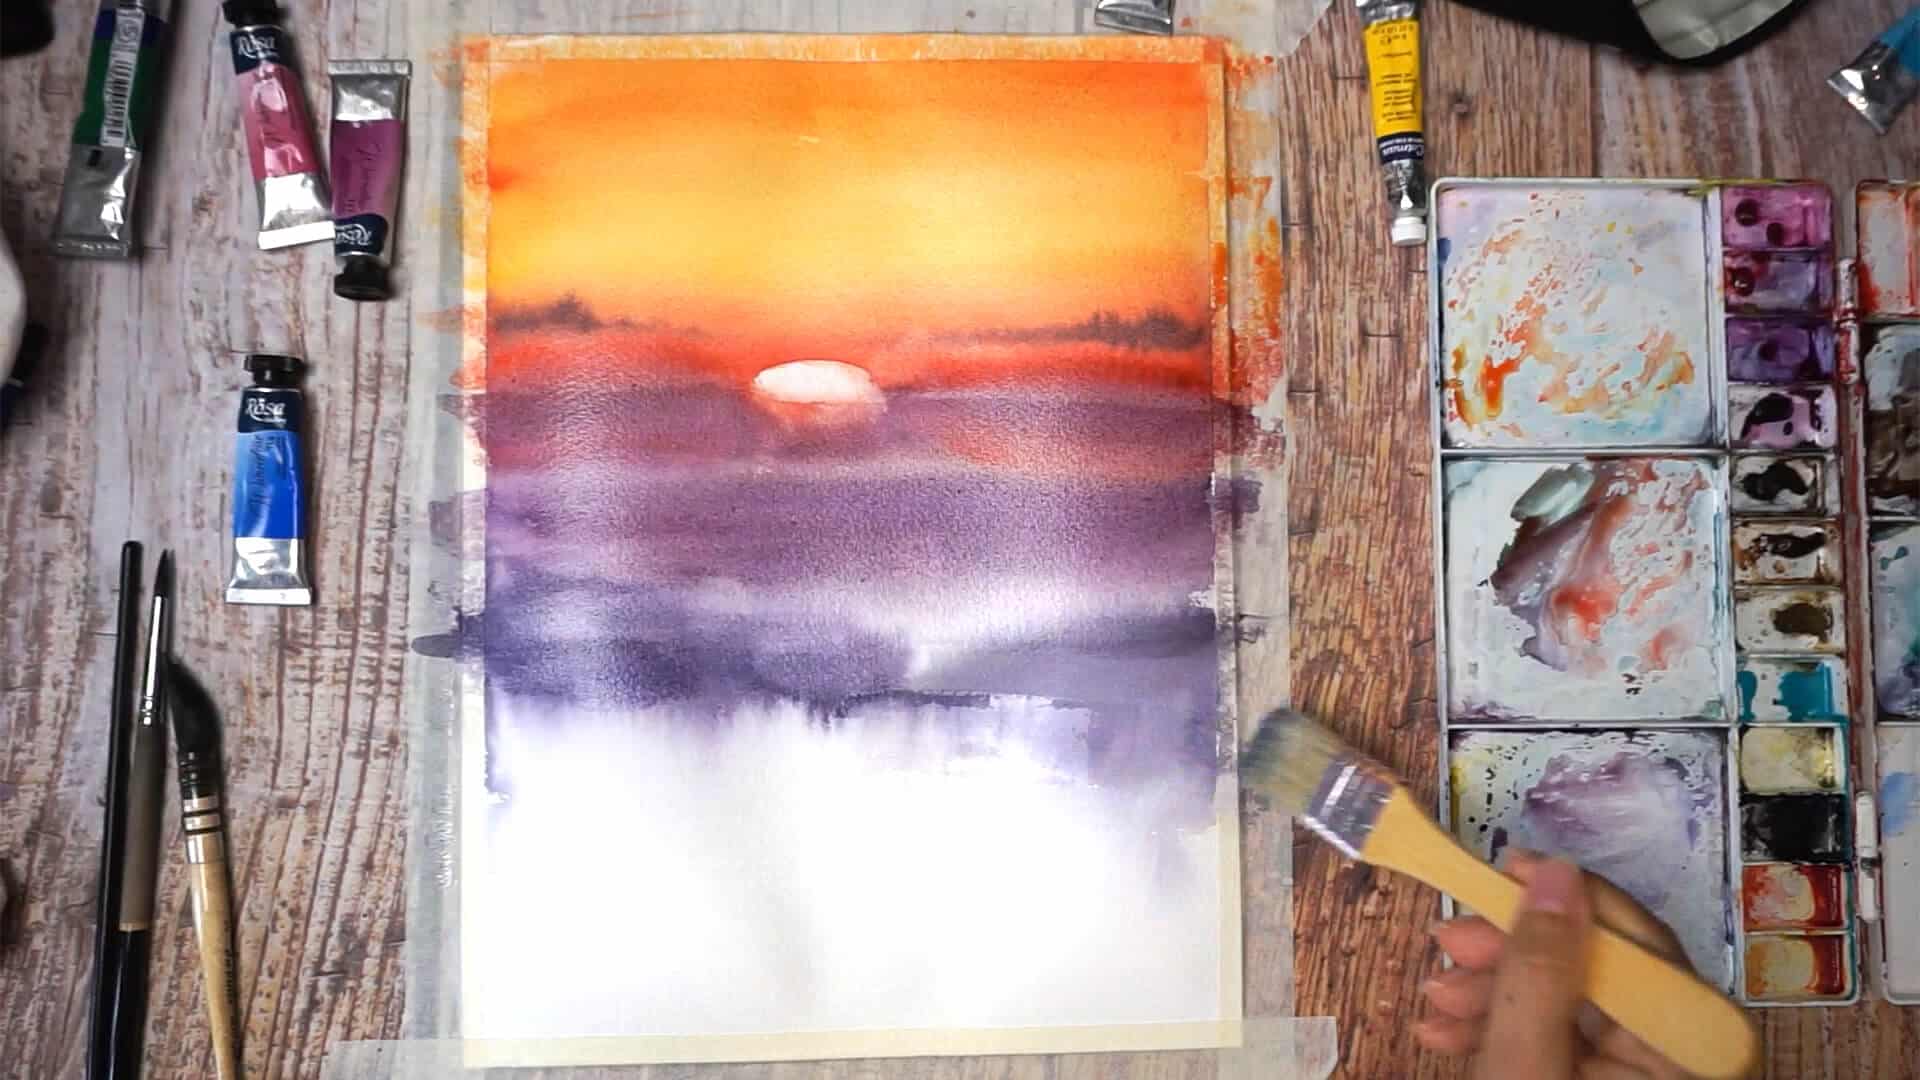
Step 05
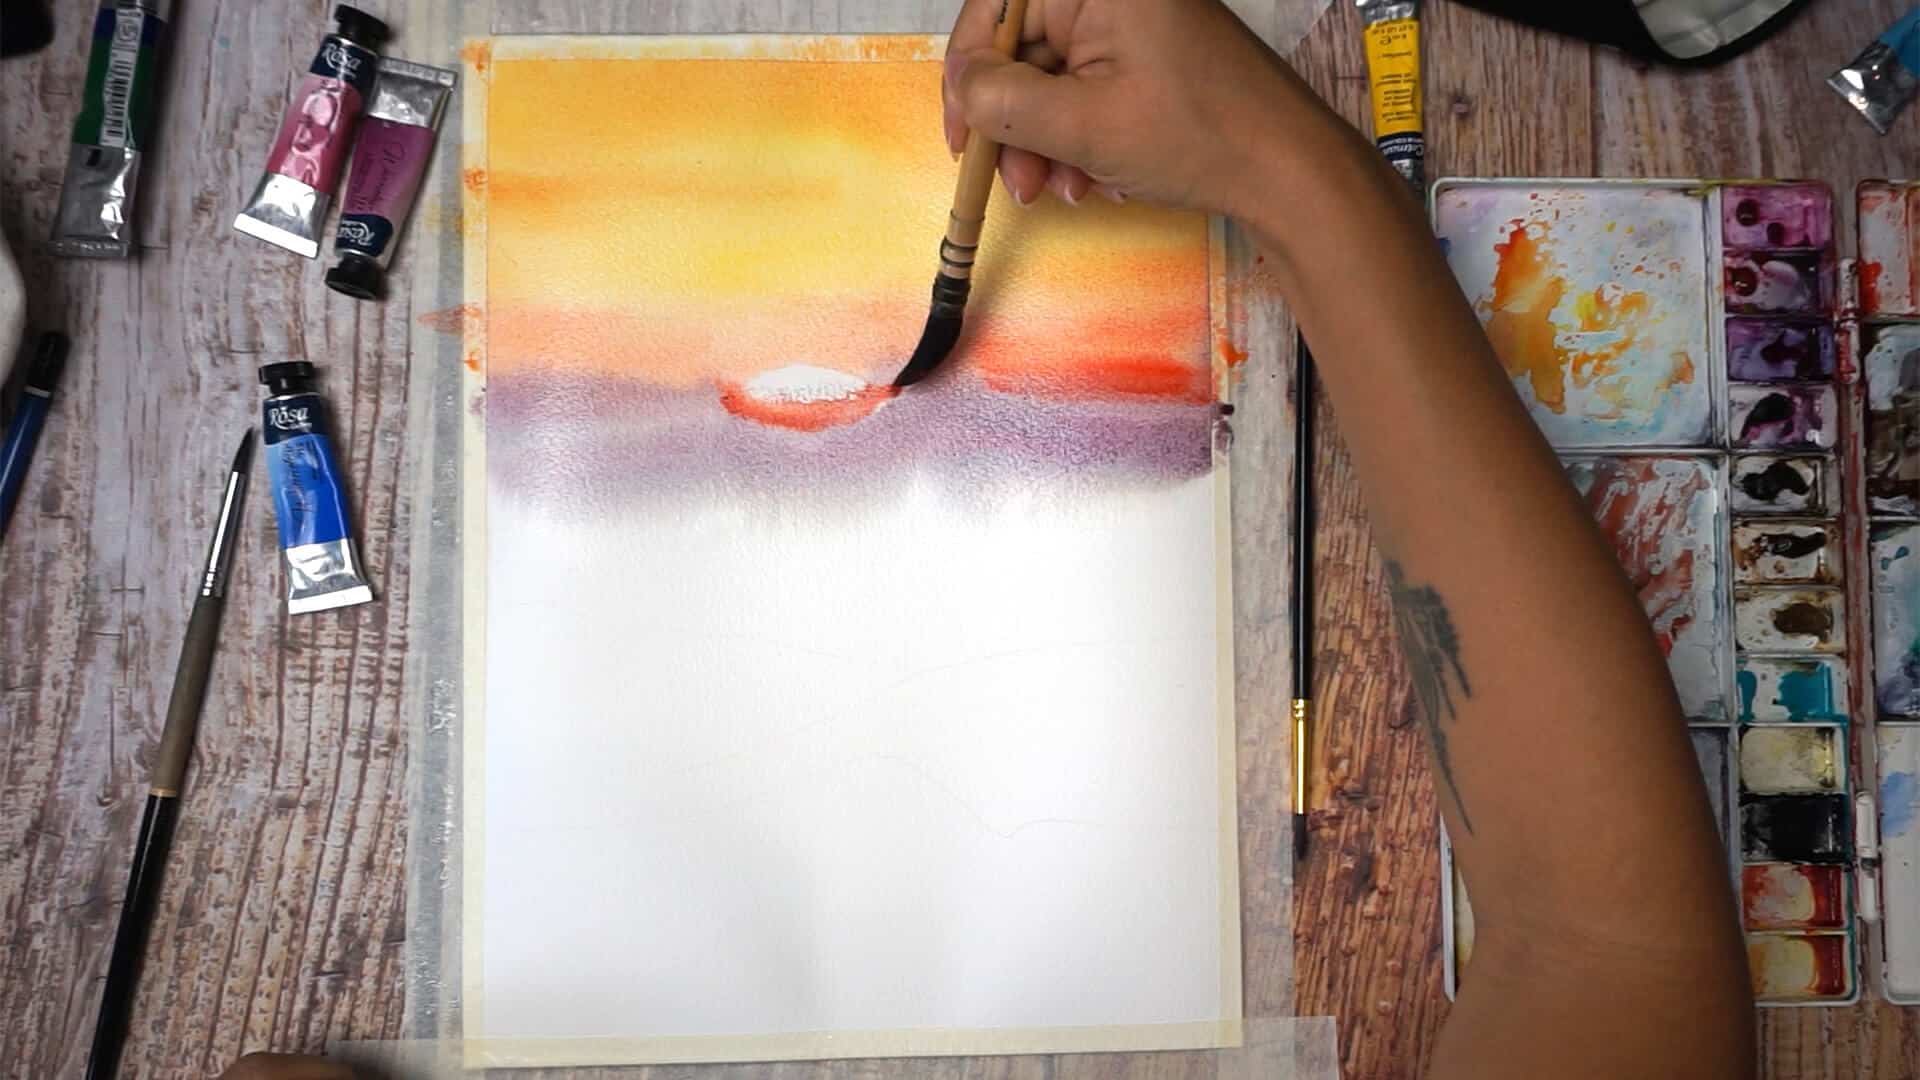
I realized that on a reference the sun was kinda surrounded with red color. No biggie! We are working with cotton, so we can add and modify our layers without much damage as long as the paper is wet. So I added another layer of red color (Cadmium Red, the same I used from the start) around the sun. I also used this as a chance to make this are juicy by amplifying the red. Watercolor tends to loose its brightness as it dries out, sometimes you need to add another layer to bring up the intensity.
Important note: when adding another layer make sure your brush is NOT soaking wet. If it has too much water and not enough paint it will dilute the previous layer (yes, even on cotton paper). So, to make magic happen you need to keep paper wet (at least a little bit) and the brush relatively dry.
Step 06
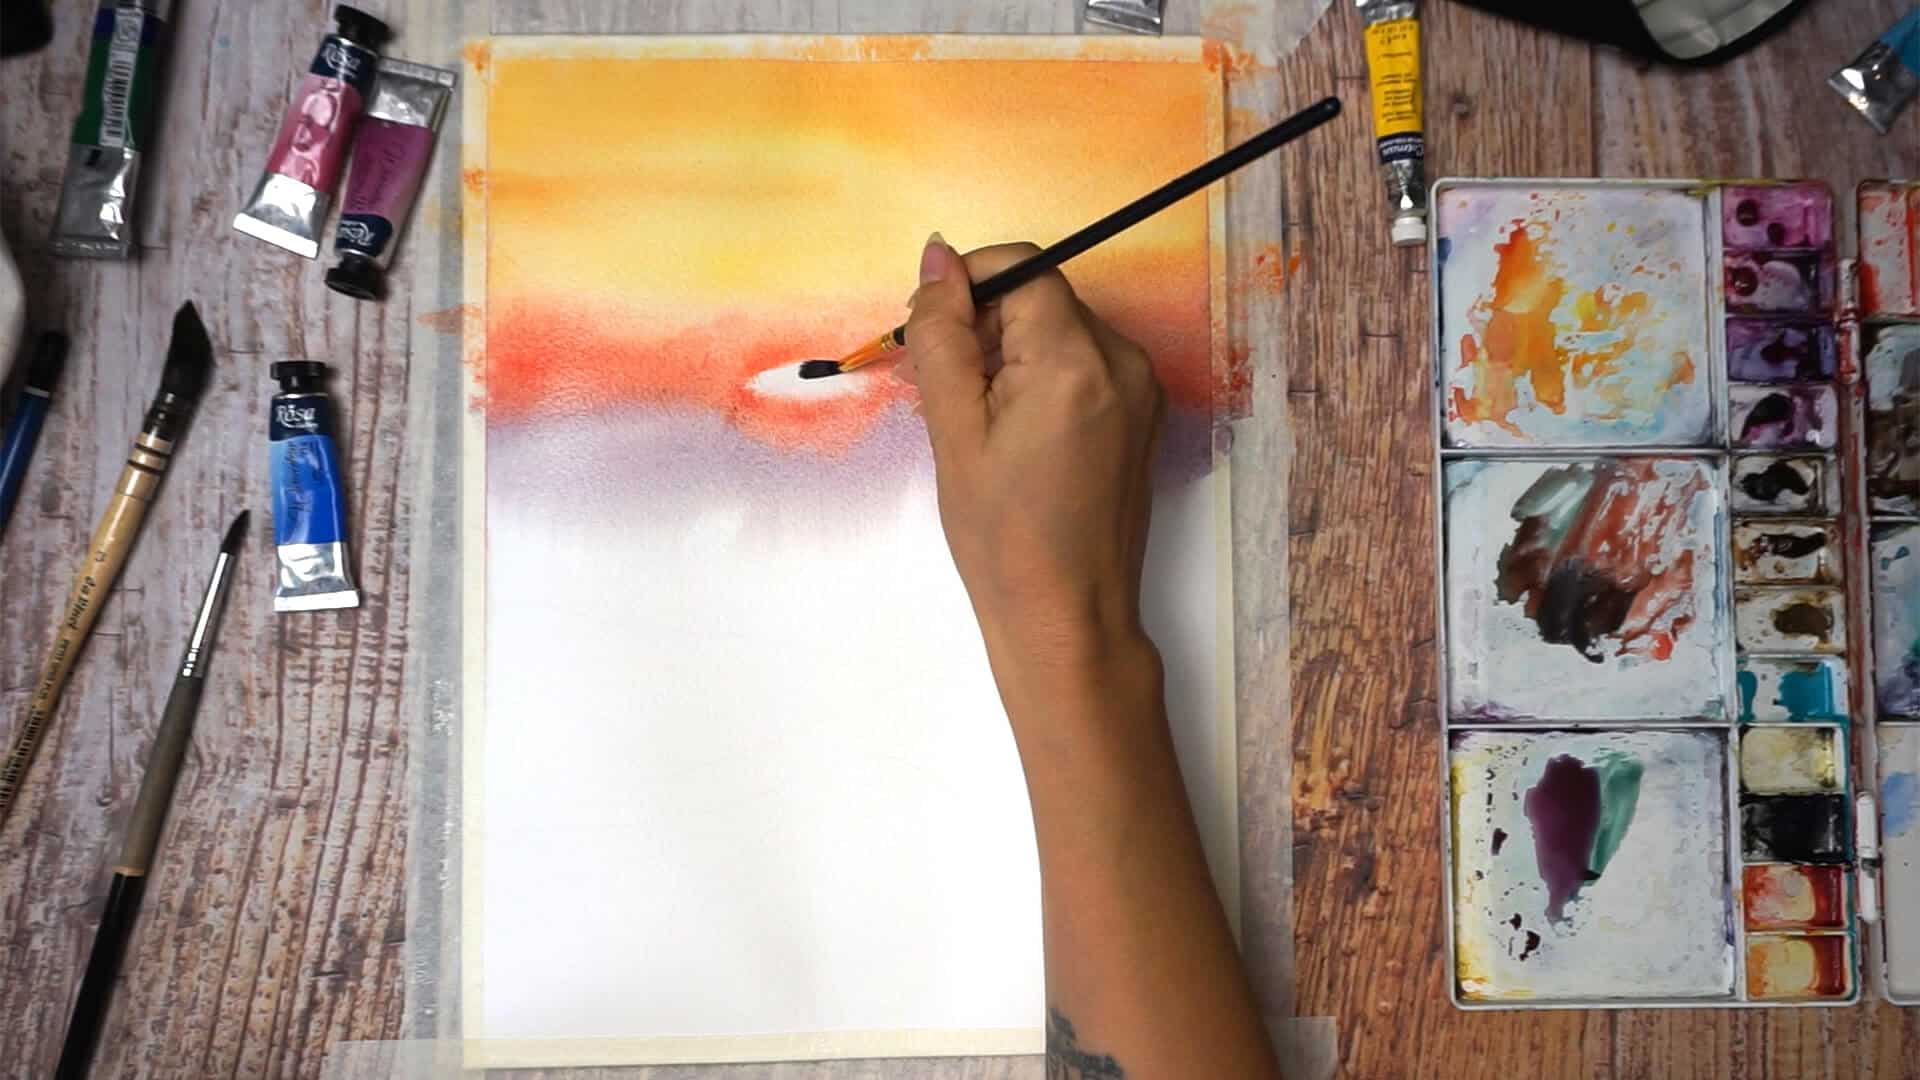
As I was working on wet paper, naturally some of the pigment leaked into the area of my sun. That’s not a problem if you notice it on time and lift the undesired paint with a synthetic brush. Keep the shape of your sun nice and clean.
Step 07
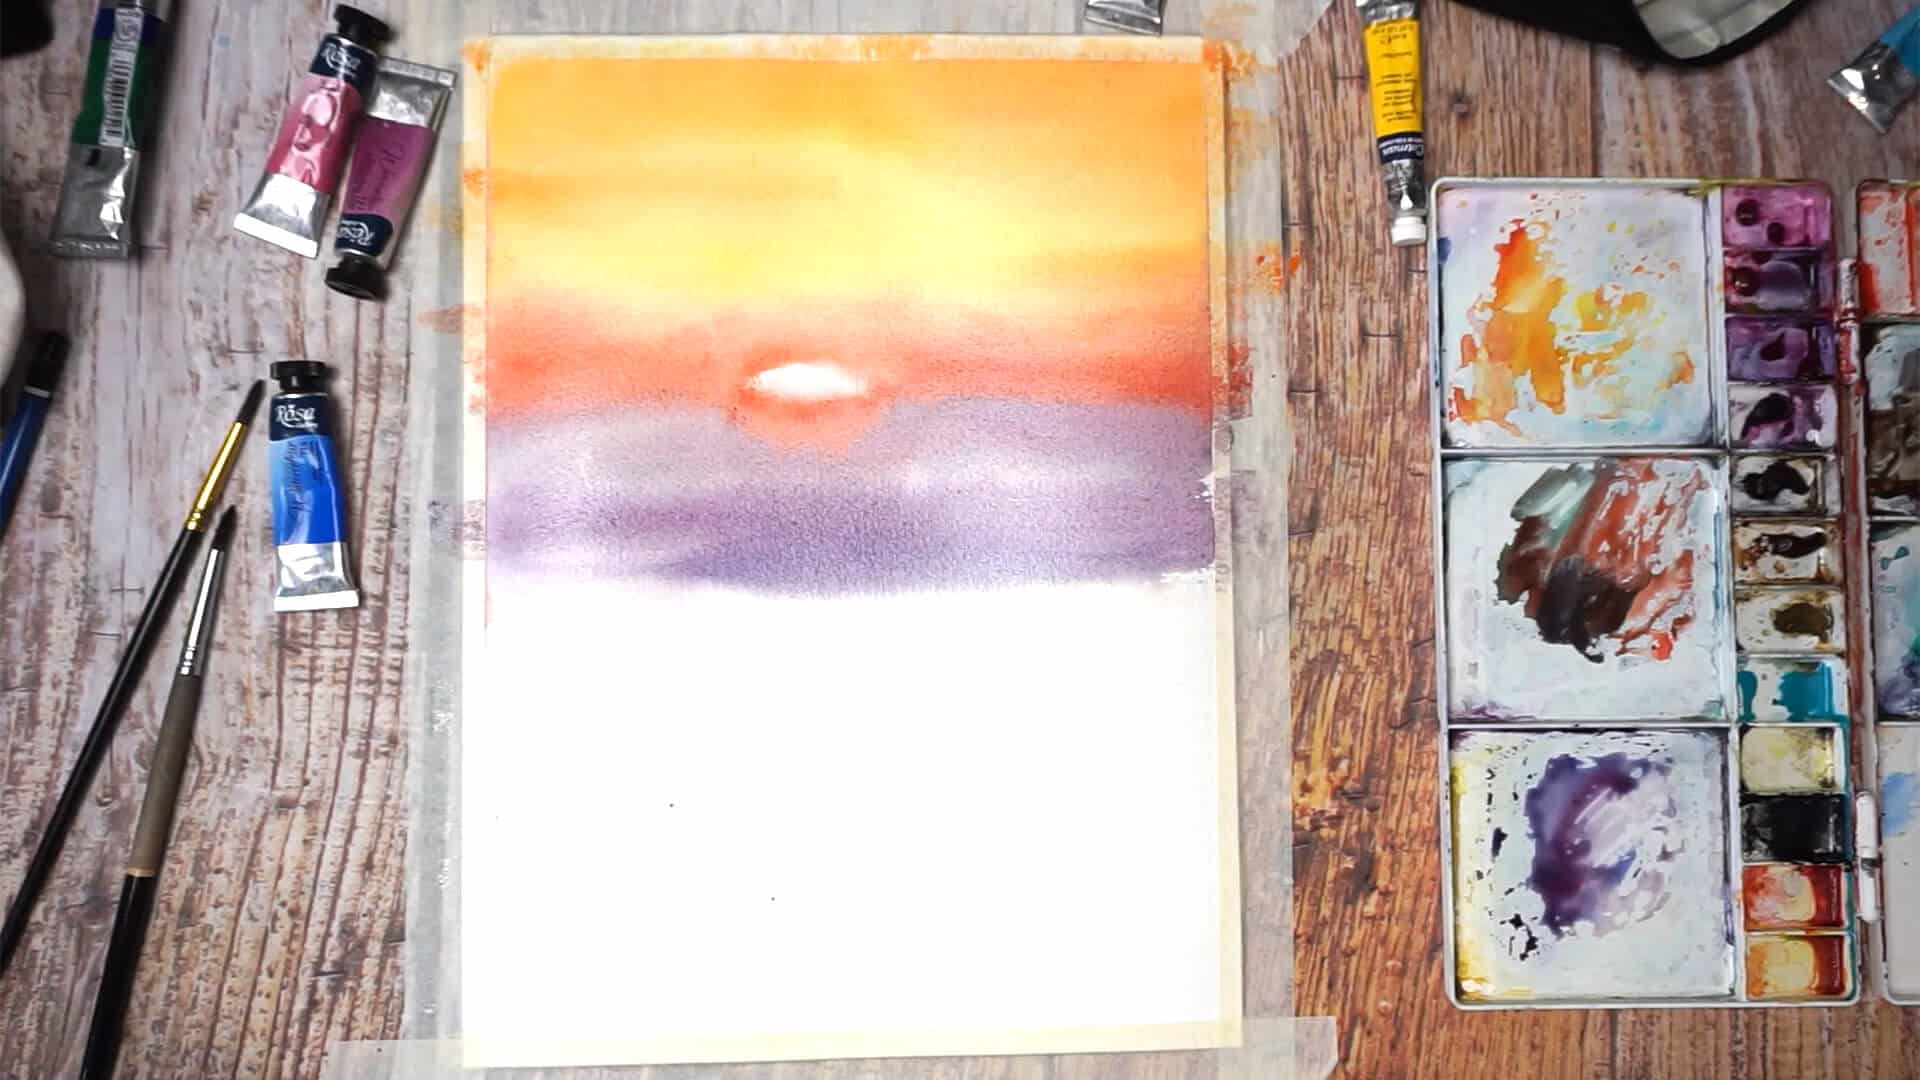
And we keep going! Apply another wide stroke of purple mix (same as earlier) right under the previous stroke. It is a nice smooth mixed wash where we cover the paper sheet with different colors one after another (or under another, should I say?). But some sections of the sky have lighter parts which we can achieve by using a gradated wash (the top of the section is concentrated and as it goes down is becomes lighter). You don’t need to copy the reference, but if you would like to practice difference washes in one painting this is a nice challenge.
Step 08
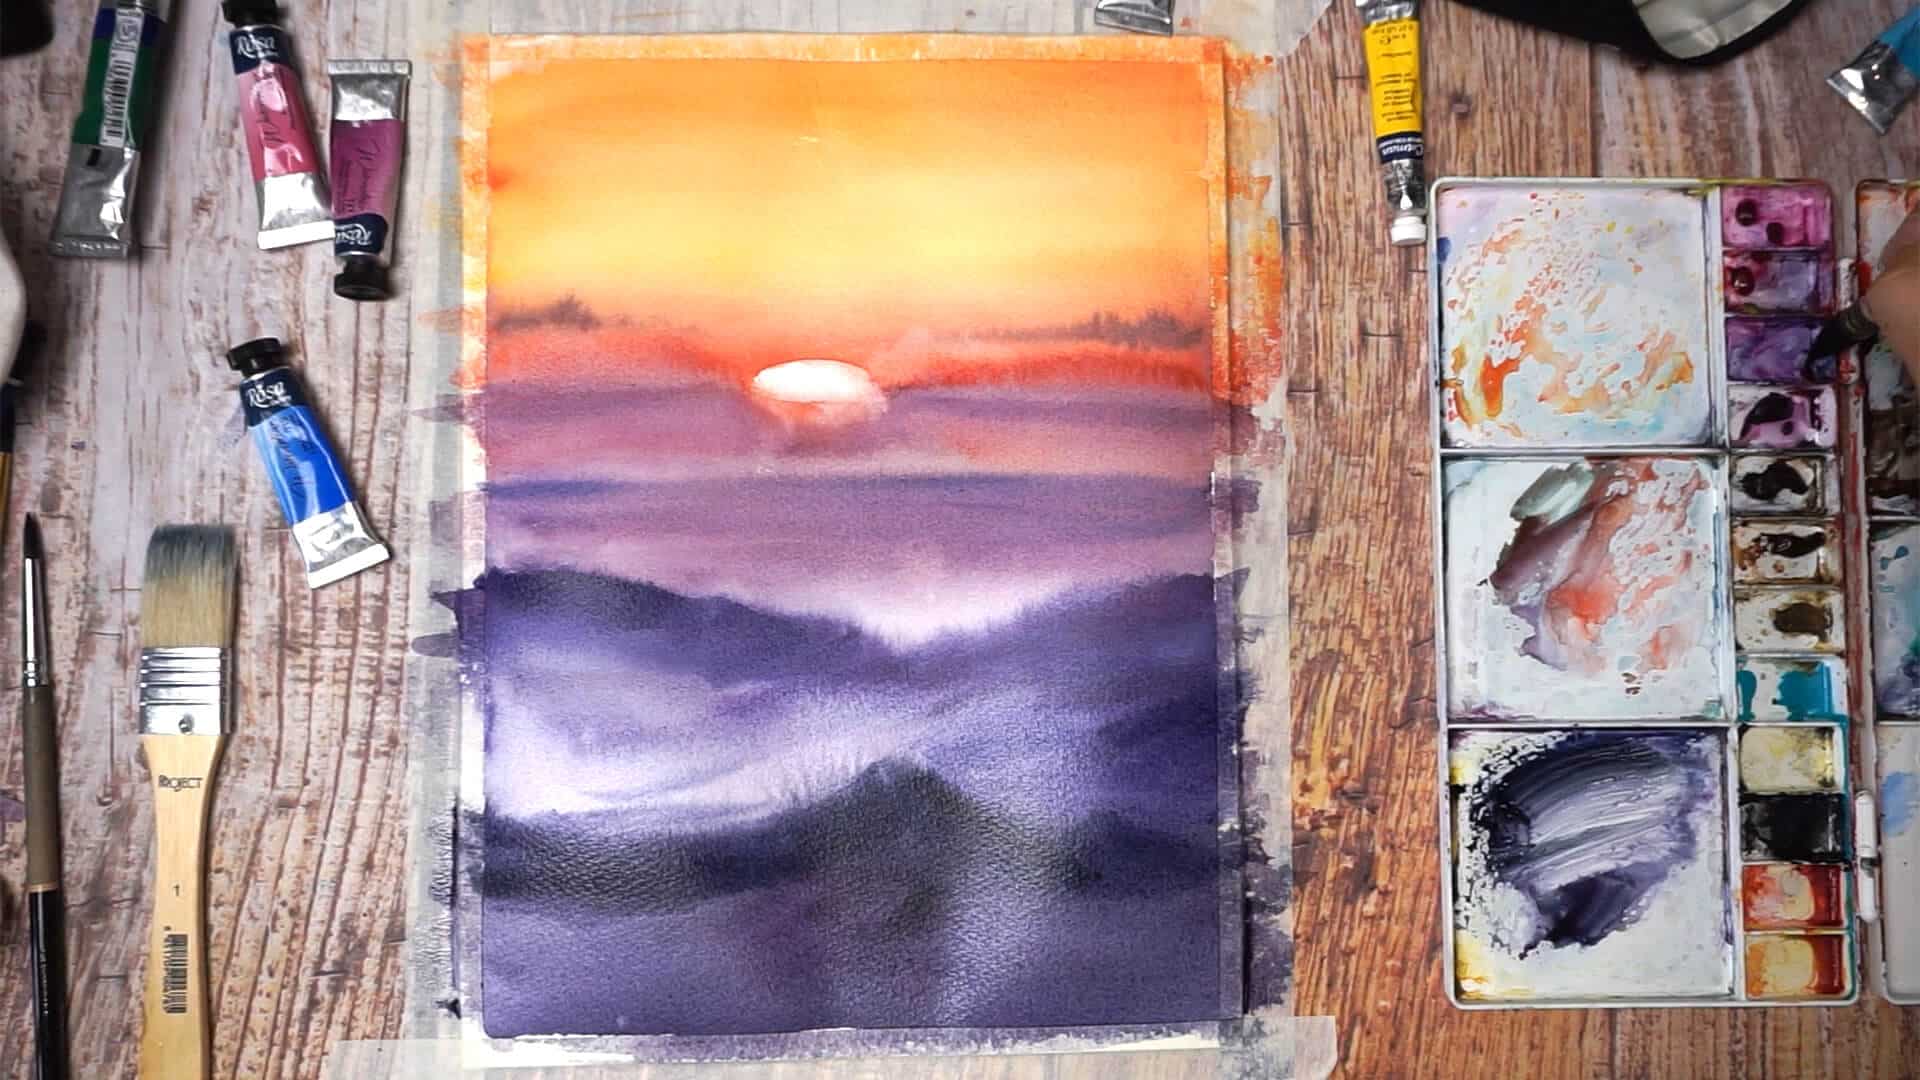
Here is a part where we start seeing a clear mountain shape, so my next stroke is going to be detached from the layer we’ve been working on. We need to let some “air” in to separate the sky from the mountain.
Step 09
I defined the mountain shapes on the left and right sides with a darker mix of purple (same as before, Quinacridone Lilac + Cadmium Red + Indanthrene Blue). Here I used more blue color in a mix to achieve darker tone.
The rule of perspective tells us that objects closer to a viewer (us) are darker than those further away from us. That’s why we are darkening tones as we move to the bottom of our painting.
Step 10
I took a step back and thought that the sky was still not bright enough. It looked kinda dull. So I went ahead and added another layer of the same color combinations just to amplify my colors. If you feel like your colors are bright enough, skip this step.
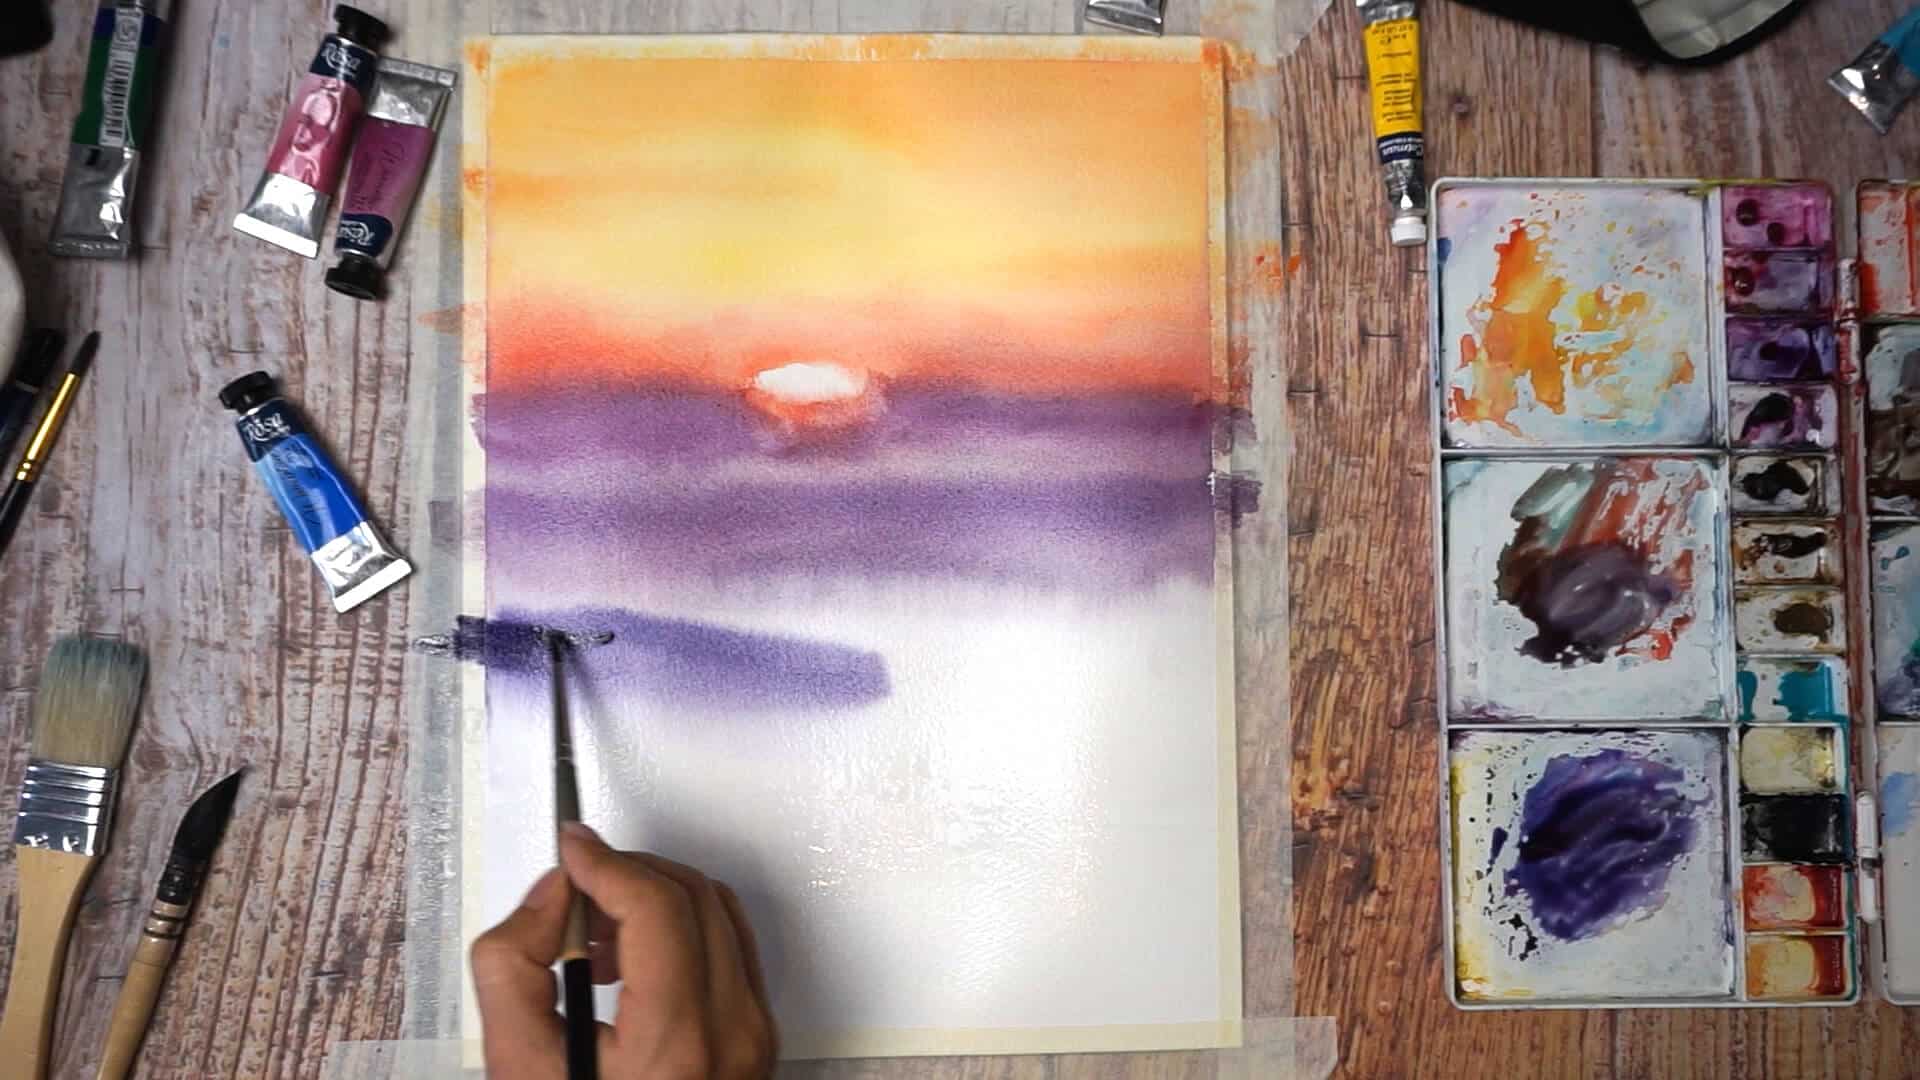
Step 11
While that fresh layer is still wet, I quickly added a couple of tiny blue-purple strokes locating fluffy clouds above the horizon line.
By this time the rest of my paper sheet got fully dry and if I continued to paint (mountains in the bottom) the stokes would turn out too dry.
So I took my big flat brush and went on top of the lowest paint layer and all the way down my paper sheet. Only do it when you are sure the paper is fully dry otherwise you will deform your previous carefully painted layers. Also, the brush should not be soaking wet, too much water could also do unnecessary damage.
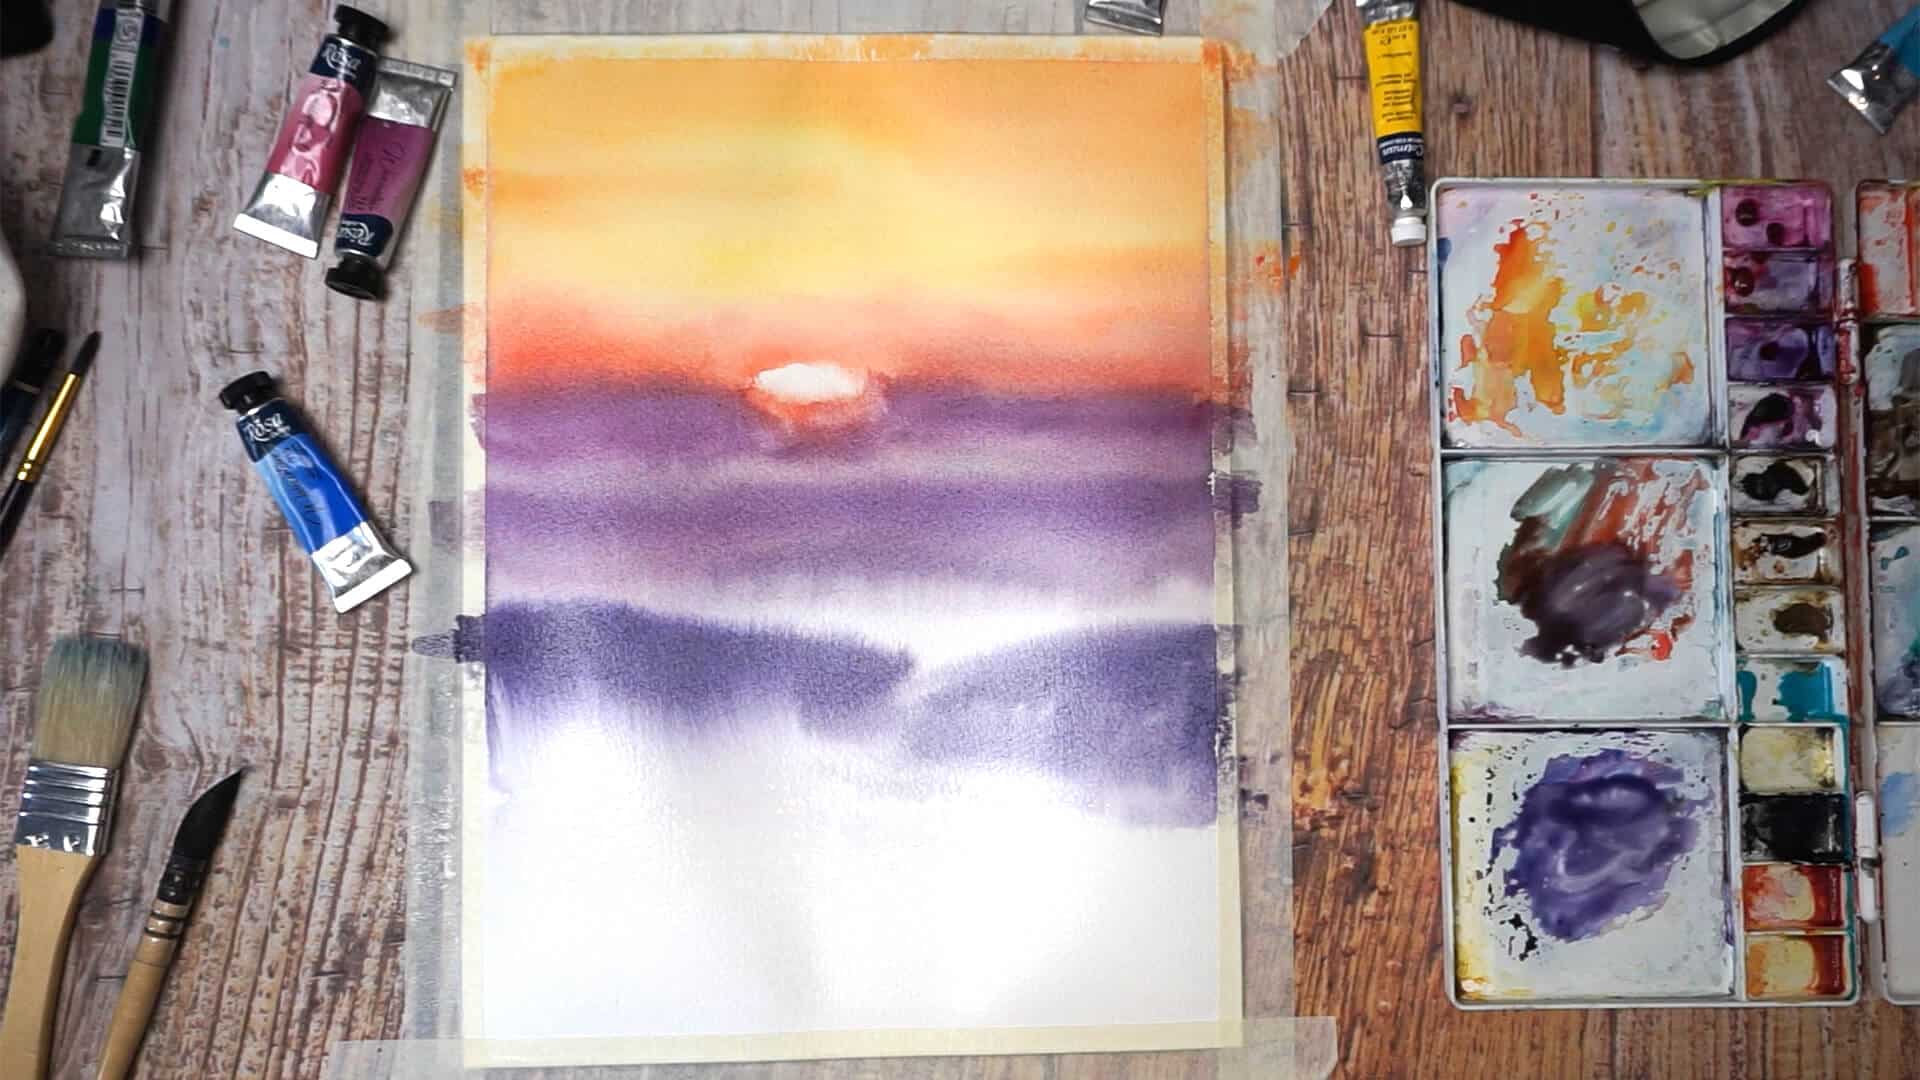
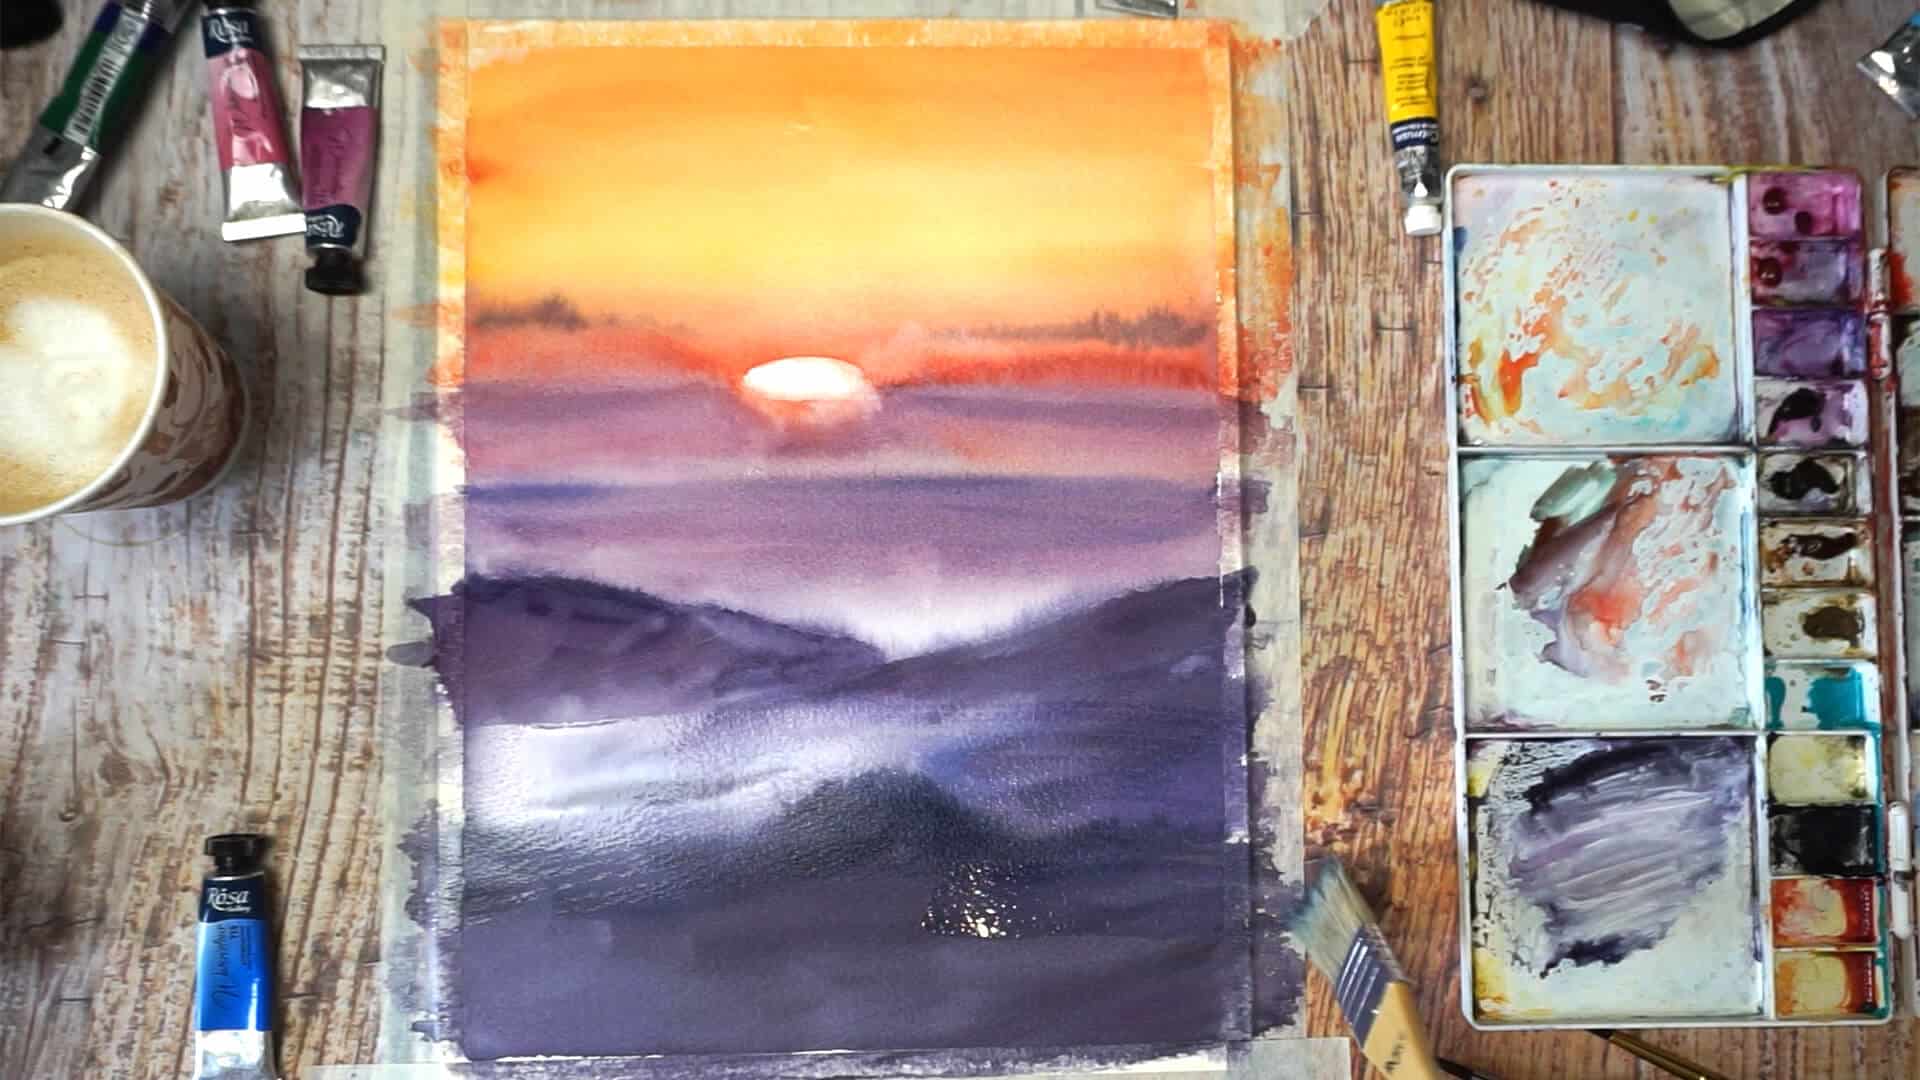
Step 12

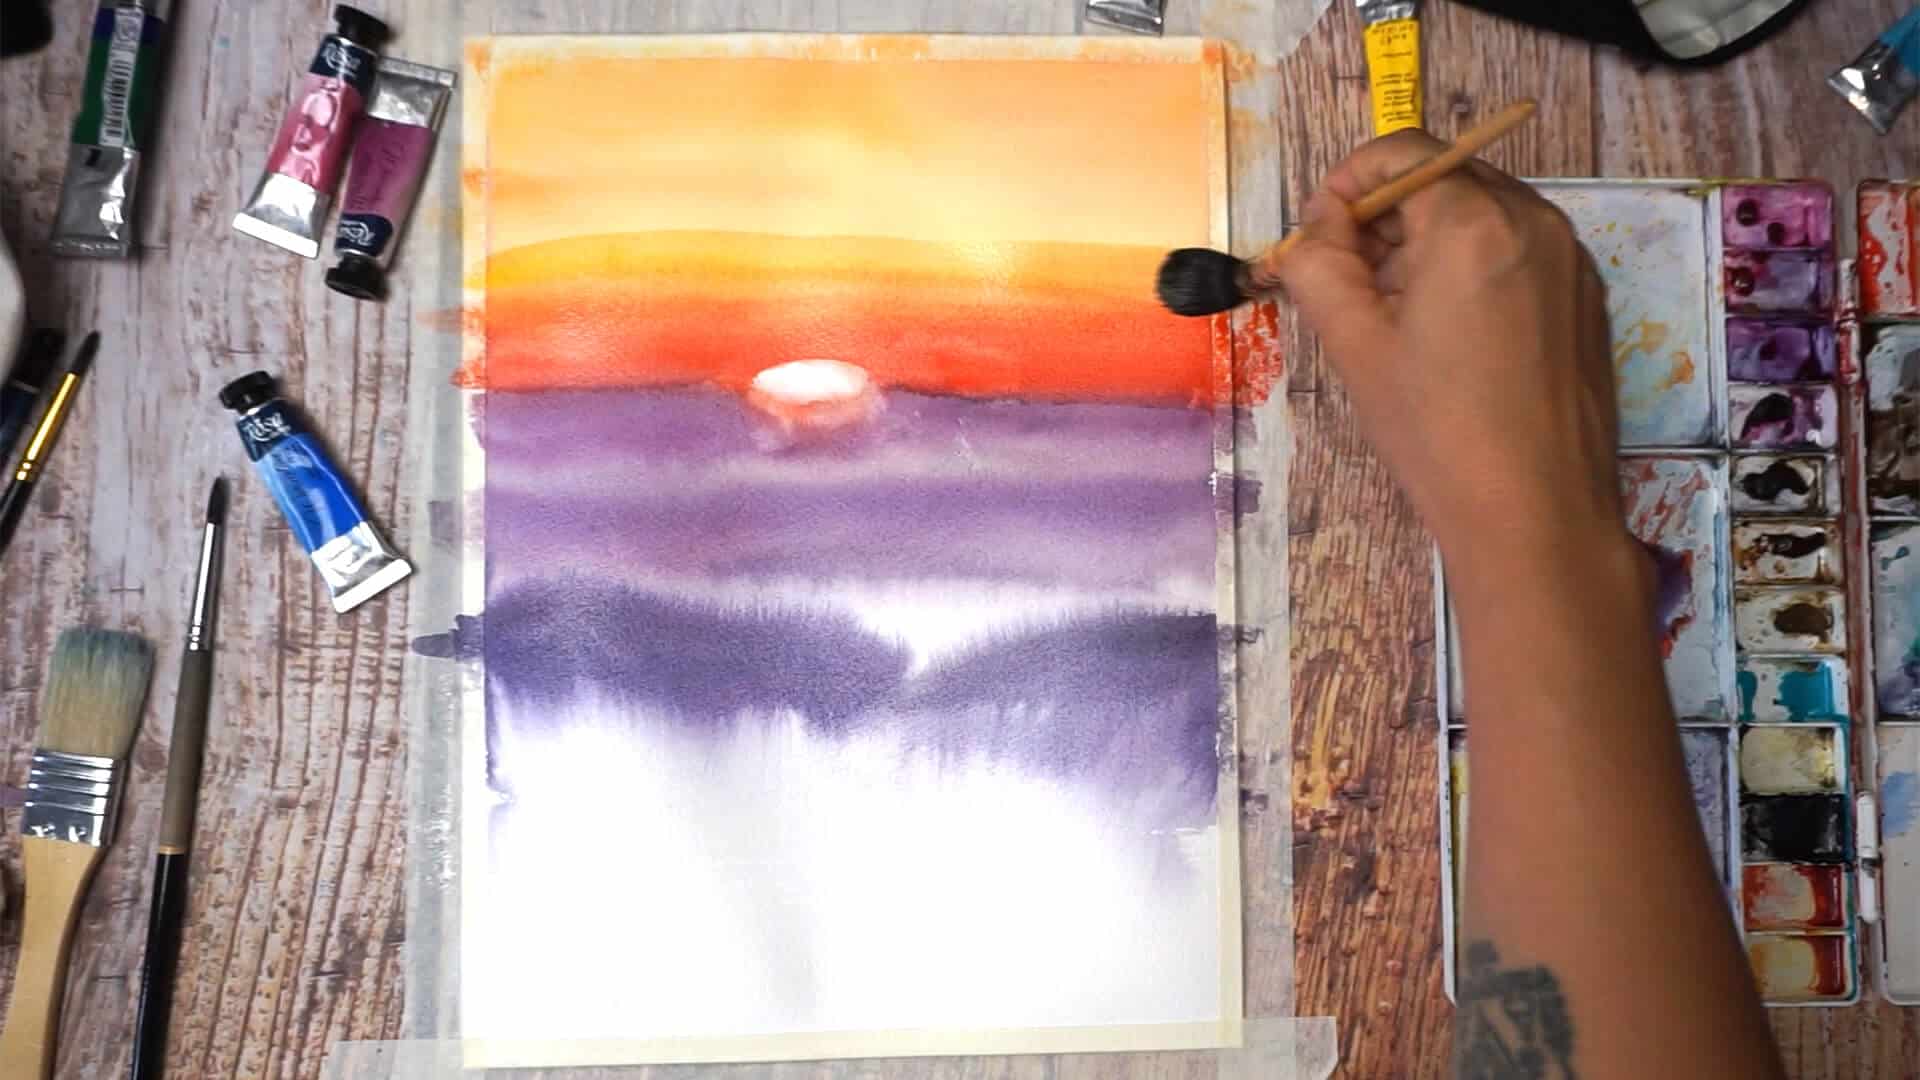
Now this area is ready for another layer of paint. Create mountains defining their shape more clearly. This part can be painted as gradated wash: the top of the mountain is more concentrated and as we go down the mountain the color gets lighter and less concentrated. This will give us a feeling of a mountain disappearing in the mist somewhere far away.
Step 13
And finally, I added the lowest mountain which is also the darkest one (because it is the closest to the viewer, remember perspective rules?).
I also left a significant piece of white (whitish) space between mountains. I didn’t want to make the bottom of the painting too heavy with a massive block of dark paint.
Now it is a good time to leave your painting to dry and see how it looks like after it is fully dry. The colors will get lighter and you might want to add something.
Step 14
After a sweet break, I looked at my completely dry painting and thought that the mountain in the bottom was not dark enough (comparing to the ones above). I wanted to increase the tone and for that I had to add another layer of paint. However I couldn’t just apply paint on top of dry paper, it would cause creation of sharp edges.
That’s why I had to use our old trick: apply clean water over already painted part to prepare the surface for a fresh layer.
Step 15
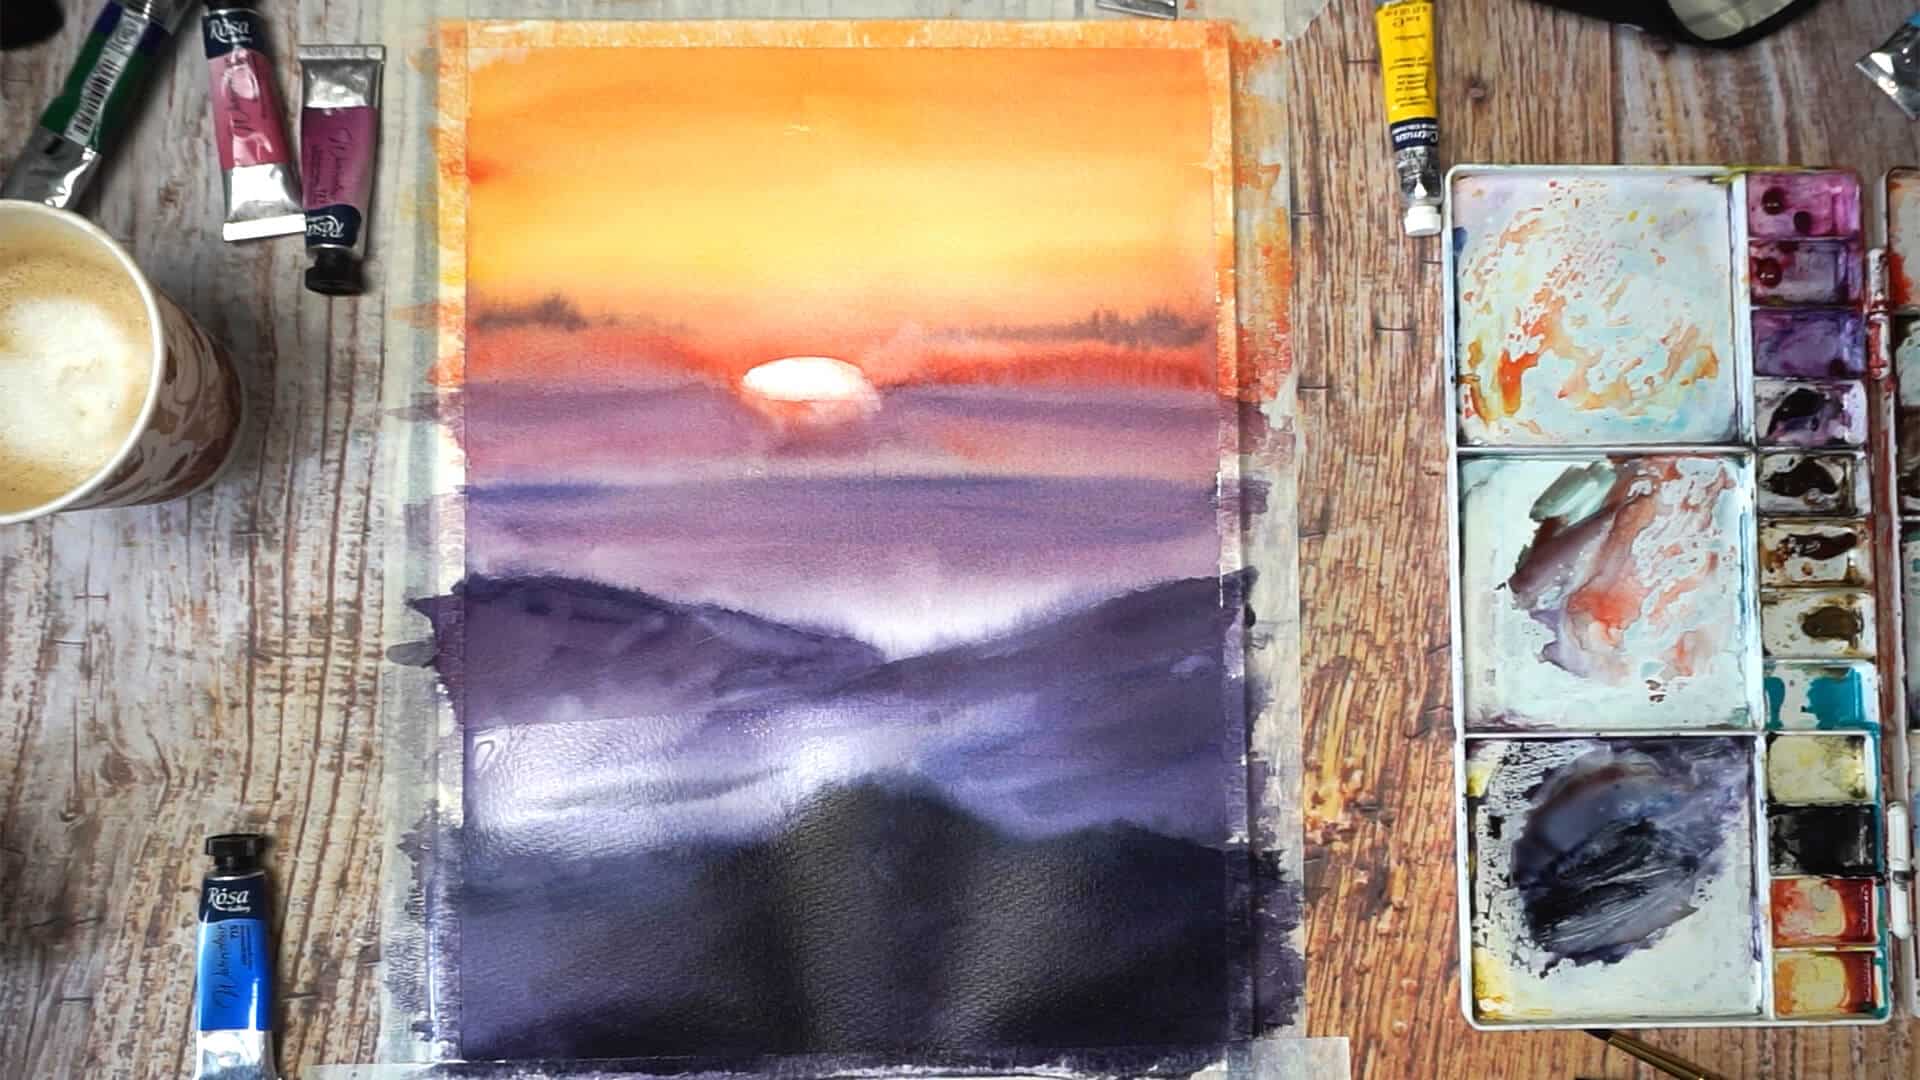
This is my final step, I deepened the tones of the bottom mountain with a much darker layer of purple (I even added a little bit of black into it). Now you can clearly feel the depth of this painting because the mountain in the bottom of the paper sheet feels much closer to us. Mission accomplished!
Wait for the artwork to dry, take off the tape and voila! Our lovely sunset is ready!
To wrap it up
Publish your final result here in comments or Instagram tagging us @watercolortravelers. We would love to see your watercolor sunset paintings! Feel free to take a look a our other watercolor tutorials too.
LIFETIME ACCESS OFFER
Lifetime access to 47 watercolor classes taught by a professional artist.
✅ Full library access, 47 classes
✅ Beginner to Advanced crash course
✅ All our ads-free YouTube videos
✅ Private Facebook group
✅ Real Teacher Feedback
✅ Optional Coaching Sessions


Excellent attempt.